Agustus 23, 2012

Arch Linux Package for ArangoDB

Finally I can finish ArangoDB package PKGBUILD for Arch Linux. The people at triAGENS are helpful. Have to say thank you for their help, especially @steemann, @loremsqlsum, and @fceller. The package can be installed just by using yaourt -S arangodb.

The package PKGBUILD can be downloaded from https://aur.archlinux.org/packages.php?ID=62227


Enjoy!

Agustus 21, 2012

Change Python Interpreter Temporary (python3 -> python2)

I came across this difficulty when I try to install ArangoDB. It comes with V8 Javascript engine from Google bundled in. Installing V8 requires Python 2, not Python 3 which is the default in my Arch Linux box.

[bpdp@bpdp-arch V8]$ ls `which python`
lrwxrwxrwx 1 root root 7 Apr 24 06:48 /usr/bin/python -> python3
[bpdp@bpdp-arch V8]$

Luckily, V8 uses "#/usr/bin/env python", not "#/usr/bin/python". To change this behaviour, all I have to do is just ask "env" to use my python2 interpreter. Here's how:

1. Create symlink to python2 under the name "python"
I put the symlink into my "$HOME/bin" directory.
$ cd ~/bin
$ ln -s /usr/bin/python2 python

2. Put into PATH

$ export PATH=~/bin:$PATH

"~/bin" should preced $PATH because env use the first setting.

[bpdp@bpdp-arch arangodb]$ which python
/home/bpdp/bin/python
[bpdp@bpdp-arch arangodb]$ env python
Python 2.7.3 (default, Apr 24 2012, 00:06:13) 
[GCC 4.7.0 20120414 (prerelease)] on linux2
Type "help", "copyright", "credits" or "license" for more information.
>>> 

There you go!

Agustus 16, 2012

NodeJS Installation Without OS Package Management

I use Arch Linux for all my OS activities. Arch Linux has NodeJS package and can be easily installed using pacman -S nodejs but you may see that NodeJS has fast release cycle that my Arch Linux package is sometimes left behind and also sometimes I want to use a specific version (for example, Ace - and editor part of Cloud9 IDE - can not work with NodeJS 0.8.x, it needs 0.6.x). Under this scheme, it can be difficult to deal with OS package management. That said, I need to use my own way to resolve this.

So, here is the way to solve the problem. Download the binary version of NodeJS or directly go to http://nodejs.org/dist/ and get the one you need. Extract into specific directory then setup some environment variables into .bashrc so that it will be read automatically whenever I login, or put that into a file and source it whenever I need it. That's all. The details will follow if you are really helpless.

1. Download the binary version. Here I use version 0.8.7:

[bpdp@bpdp-arch nodejs]$ ls -la
total 4320
drwxr-xr-x  2 bpdp users    4096 Aug 17 06:08 .
drwxr-xr-x 22 bpdp users    4096 Aug 16 16:17 ..
-rw-r--r--  1 bpdp users 4401729 Aug 16 06:19 node-v0.8.7-linux-x86.tar.gz
[bpdp@bpdp-arch nodejs]$ 

2. Extract into the directory of your own choice:

[bpdp@bpdp-arch software]$ tar -xzvf ~/master/nodejs/node-v0.8.7-linux-x86.tar.gz
[bpdp@bpdp-arch software]$ ln -s node-v0.8.7-linux-x86 nodejs
[bpdp@bpdp-arch software]$ ls -la
....
....
drwxr-xr-x   6 bpdp users  4096 Aug 16 06:18 node-v0.8.7-linux-x86
lrwxrwxrwx   1 bpdp users    21 Aug 17 06:37 nodejs -> node-v0.8.7-linux-x86
....
....
[bpdp@bpdp-arch software]$ 

3. Set some environment variables

[bpdp@bpdp-arch environment]$ cat nodejs 
NODEJS_HOME=/home/bpdp/software/nodejs

PATH=$PATH:$NODEJS_HOME/bin
MANPATH=$MANPATH:$NODEJS_HOME/share/man
LD_LIBRARY_PATH=$LD_LIBRARY_PATH:$NODEJS_HOME/lib
C_INCLUDE_PATH=$C_INCLUDE_PATH:$NODEJS_HOME/include
CPLUS_INCLUDE_PATH=$CPLUS_INCLUDE_PATH:$NODEJS_HOME/include

export PATH
export MANPATH
export LD_LIBRARY_PATH
export C_INCLUDE_PATH
export CPLUS_INCLUDE_PATH
[bpdp@bpdp-arch environment]$ 

4. Source it whenever you need it:

$ source ~/environment/nodejs

Note: I put the env var into a file: $HOME/environment/nodejs

5. Surely you may also put that into your $HOME/.bashrc for automatic activation.

That's all. Happy coding!

Agustus 14, 2012

Working with GitHub and Clojars


This guide is used as a note for myself. If you can benefit from this note, that's fine. Here I just wish to document how I work with GitHub and Clojars. I need to do this since I have my own need for Ring middleware to reload automatically a server without restart whenever a namespace in Ring is modified. The original version was not maintained I think, since it uses Clojure 1.2.0.

GitHub

I forked the ring-reload-modified to my Github account. This can be done easily using step 1 and 2 from https://help.github.com/articles/fork-a-repo (I use only step 1 and 2 since I only want to fork and modified my forked version, not upstream version).

Let's say for this time I just want to edit the README.md and project.clj files. After I edit those files, I just put them in committed state:

[bpdp@bpdp-arch ring-reload-modified]$ git status
# On branch master
# Changes not staged for commit:
#   (use "git add [file]..." to update what will be committed)
#   (use "git checkout -- [file]..." to discard changes in working directory)
#
# modified:   README.md
# modified:   project.clj
#
no changes added to commit (use "git add" and/or "git commit -a")
[bpdp@bpdp-arch ring-reload-modified]$

We can see from the status that it has 2 changes: README.md and project.clj but I haven't commit anything. Here's how to commit:

[bpdp@bpdp-arch ring-reload-modified]$ git commit -a
[master ada41aa] Adjust to latest Clojure version (1.4.0)
 2 files changed, 8 insertions(+), 4 deletions(-)
[bpdp@bpdp-arch ring-reload-modified]$ 

Then it's time to push the committed version to Github repository:

 [bpdp@bpdp-arch ring-reload-modified]$ git push origin master
 Username for 'https://github.com': bpdp
 Password for 'https://bpdp@github.com': 
 Counting objects: 7, done.
 Delta compression using up to 2 threads.
 Compressing objects: 100% (4/4), done.
 Writing objects: 100% (4/4), 721 bytes, done.
 Total 4 (delta 2), reused 0 (delta 0)
 To https://github.com/bpdp/ring-reload-modified.git
    6dfdc5c..ada41aa  master -> master
 [bpdp@bpdp-arch ring-reload-modified]$

Let's see the result in Github profile:


The result in Github project page (I have pushed another commit so the history is different with above).


Clojars

To upload the library, I need to prepare my ssh public key first:

[bpdp@bpdp-arch ring-reload-modified]$ ssh-keygen -t rsa
Generating public/private rsa key pair.
Enter file in which to save the key (/home/bpdp/.ssh/id_rsa): 
/home/bpdp/.ssh/id_rsa already exists.
Overwrite (y/n)? y
Enter passphrase (empty for no passphrase): 
Enter same passphrase again: 
Your identification has been saved in /home/bpdp/.ssh/id_rsa.
Your public key has been saved in /home/bpdp/.ssh/id_rsa.pub.
The key fingerprint is:
87:fc:8f:35:18:20:2e:8f:73:d2:b5:71:ea:0e:85:01 bpdp@bpdp-arch
The key's randomart image is:
+--[ RSA 2048]----+
|    E            |
|     .           |
|      o .        |
|     . = o       |
|    . o S +      |
|     = o B o     |
|    + = o o o    |
|     + o   + .   |
|       .o . .    |
+-----------------+
[bpdp@bpdp-arch ring-reload-modified]$

The public key should be put into the Clojars first. So, first we need to register by using http://clojars.org/register:


Now, it's time to upload to Clojars:

[bpdp@bpdp-arch ring-reload-modified]$ lein2 jar   
Created /home/bpdp/master/clojure/libs/ring-reload-modified/target/ring-reload-modified-0.1.2.jar
[bpdp@bpdp-arch ring-reload-modified]$ lein2 pom
Wrote /home/bpdp/master/clojure/libs/ring-reload-modified/pom.xml
[bpdp@bpdp-arch ring-reload-modified]$ scp pom.xml target/ring-reload-modified-0.1.2.jar clojars@clojars.org:
Enter passphrase for key '/home/bpdp/.ssh/id_rsa': 
Welcome to Clojars, bpdp!
pom.xml                                                           100% 2672     2.6KB/s   00:00    
ring-reload-modified-0.1.2.jar                                    100% 5328     5.2KB/s   00:00    

Deploying org.clojars.bpdp/ring-reload-modified 0.1.2

Success! Your jars are now available from http://clojars.org/
[bpdp@bpdp-arch ring-reload-modified]$

Now I can use the library that I upload to Clojars:


That's all big guy. Have a happy hacking!


Agustus 12, 2012

Mengakses Basis Data Graph OrientDB Menggunakan Clojure

OrientDB adalah salah satu basis data NOSQL dengan kemampuan basis data obyek, graph, document, serta flat. API untuk basis data ini bermacam-macam dan karena dikembangkan menggunakan Java, maka API yang paling utama adalah Java, meski demikian, tersedia juga API untuk JavaScript dan implementasi bahasa-bahasa pemrograman berbasis JVM seperti Clojure dan Scala.

Pada tulisan ini saya akan sedikit membahas tentang akses dengan menggunakan Clojure. Wrapper Clojure untuk API OrientDB dibuat oleh Eduardo Julián. Versi binary bisa diperoleh dari http://clojars.org melalui Leiningen dan versi kode sumber bisa diperoleh di https://github.com/eduardoejp/clj-orient (sayangnya, dokumentasi kurang jelas). Langkah sederhana berikut digunakan untuk mengakses OrientDB dari Clojure menggunakan Leiningen.

1. Buat project

$ lein new orientweb

2. Hasil:

[bpdp@bpdp-arch orientweb]$ tree
|-- README.md
|-- doc
|   `-- intro.md
|-- project.clj
|-- src
|   `-- orientweb
|       `-- core.clj
`-- test
    `-- orientweb
        `-- core_test.clj
5 directories, 6 files
[bpdp@bpdp-arch orientweb]$ 

3. Edit project.clj, isikan berikut ini:
 
(defproject orientweb "0.1.0-SNAPSHOT"
  :description "FIXME: write description"
  :url "http://example.com/FIXME"
  :license {:name "Eclipse Public License"
               :url "http://www.eclipse.org/legal/epl-v10.html"}
  :dependencies [[org.clojure/clojure "1.4.0"]
                         [clj-orient "0.5.0"]]
  :main orientweb.core)

4. Download dependencies dengan perintah:
 
lein deps

5. Koneksi terdapat pada file core.clj
 
(ns orientweb.core)
(require '[clj-orient.core :as orientcore]
            '[clj-orient.graph :as orientgraph])
 
(orientcore/set-db! (orientgraph/open-graph-db! "remote:localhost/demo" "admin" "admin"))

(def mydb (orientcore/db-info orientcore/*db*))

(defn -main 
   [& args]
   (println "Information about the database:")
   (doseq [[key val] mydb] (prn key val))
   (orientcore/close-db!))

6. Hasil eksekusi:
 
[bpdp@bpdp-arch orientweb]$ lein compile
Compiling orientweb.core
Compilation succeeded.
[bpdp@bpdp-arch orientweb]$ lein run
All namespaces already :aot compiled
Information about the database:
:name "demo"
:url "remote:localhost/demo"
:status "OPEN"
:user #
[bpdp@bpdp-arch orientweb]$ 

Happy hacking!

Juli 28, 2012

Fancy Header with KOMA-Script

Using KOMA-script for my dissertation, does make me a bit confuse. Reading its manual is a bit daunting since I am a new user of KOMA-Script although I am a self-proclaimed average LaTeX user. Here I will give a guide to create fancy header. I will not explain a lot, just directly put my LaTeX source so that you can get them directly to create a fancy header. Here's the source:

\documentclass{scrreprt}
\usepackage{url}
\usepackage{listings}

\usepackage[usenames,dvipsnames]{color}
\usepackage[T1]{fontenc}
\usepackage{wrapfig}
\usepackage[pdftex]{graphicx}
\usepackage{setspace}

\usepackage[Sonny]{fncychap}
%\usepackage[Bjornstrup]{fncychap}

\usepackage[automark]{scrpage2}

\begin{document}

 \pagestyle{scrheadings}
 \setheadsepline{.4pt}
 \clearscrheadings
 \automark[section]{chapter}
 \ihead{\headmark}
 \ohead{\pagemark}
 \cfoot{}

 \KOMAoptions{abstract=on}

 \definecolor{light-gray}{gray}{0.95}
 \lstset{numbers=left,basicstyle=\scriptsize,numberstyle=\scriptsize,frame=tb,captionpos=b,backgroundcolor=\color{light-gray},showspaces=false,showstringspaces=false}

 \input{./cover.tex}
 \input{./abstract.tex}

 \tableofcontents

 \listoffigures

 \lstlistoflistings

 \input{./01-introduction.tex}
 \input{./02-background.tex}
 \input{./03-research-goals.tex}
 \input{./04-research-contributions.tex}
 \input{./05-future-directions.tex}
 \input{./06-bibliographies.tex}

\end{document}


I put all of my main full source so that you can imagine how to fit KOMA-Script into your source. The part of the source which come from KOMA-Script listed below:

Preparation

\documentclass{scrreprt}

\usepackage[automark]{scrpage2}


Header Definition

 \pagestyle{scrheadings}
 \setheadsepline{.4pt}
 \clearscrheadings
 \automark[section]{chapter}
 \ihead{\headmark}
 \ohead{\pagemark}
 \cfoot{}


Display "Abstract" Title

 \KOMAoptions{abstract=on}


The result is the document which has page number as the footer in every beginning of the chapter and the fancy header with chapter - section - page number and line for the next pages.


I believe that you love to read the manual, so if you want to know the meaning of the commands above, have a look at KOMA-Script manual. :)

Juli 27, 2012

Install User Level Tex Live Package - fncychap

Tex Live provide a big comprehensive TeX system which is very useful for document production. Although Tex Live provide complete but still there are lots of packages which are available at CTAN and can be installed to suit our need. Here I will explain a bit about how to install a package, specifically at user level, not global level. The package which will be installed is fncychap. This package is used to manage our "Chapter" display.

Directory Location

Packages in Tex Live installed in and /usr/share/texmf-dist. Those packages are available for all of users in the system. To check whether a package is installed, we can test it by asking kpsewhich to the system:

$ kpsewhich fancyhdr.sty
/usr/share/texmf-dist/tex/latex/fancyhdr/fancyhdr.sty
$

We may see the pattern. All of the package's file reside in /usr/share/texmf-dist/tex/latex/package-name/. If we want to install the package, actually we can do that easily by just copy all of the distribution according to this pattern, but this practice is discouraged and considered a bad practice since it can be confusing whenever we want to uninstall or whenever Tex Live is upgraded. If it can not find the package, it will says like this:

$ kpsewhich wuthesis
$

Well, nothing, huh? Yes. It says nothing. How polite :). In my Linux box, all of the user level packages should be installed by copy them to $HOME/texmf/tex/latex/, so whenever we want to install package, just copy them to that directory:

$ ls -la ~/texmf/tex/latex/
total 12
drwxr-xr-x 3 bpdp users 4096 Jul 28 10:05 .
drwxr-xr-x 3 bpdp users 4096 Jul 28 09:18 ..
drwxr-xr-x 2 bpdp users 4096 Jul 28 09:18 fncychap
[bpdp@bpdp-arch submitted]$

Enter fncychap

fncychap package is a package, created by Ulf. A. Lindgren, to alter chapter headings appearance. To install this package, just copy them to $HOME/texmf/tex/latex/ as written above. To use this package, just use it:

...
\usepackage[Sonny]{fncychap}
...

You may other style then Sonny, for example Bjarne, Lenny, Bjornstrup, Glenn, Conny, and Rejne. The result is like this:


Beautiful :)

Juli 14, 2012

Web Semiotics: Web As a Sign System


Introduction

A "web application", also known as "website" or just "web", is a kind of application which uses client-server architecture built on top of TCP/IP network infrastructure. This has become an important part of every organization in the world. Lots of people around the world use organization's website as the way to find any information about organization, products, quality, and any other things specific for that organization. Therefore, it is important to understand how one can develop a website which will become a representation of the organization. In this sense, we may say that the website has become a sign which will represent the organization. An understanding of the sign systems as the key concepts in semiotics will be important for web engineer.

What is Semiotics?

Semiotics itself is a complex topic. Its root comes from ancient greek although at first it comes from medical things by Hippocrates (460 - 377 BC) to mean essentially a medical diagnosis, a disease based on 'sign' or known as symptoms. It was Plato (circa 428 - 347 BC) who took it away from medical diagnosis with his argumentation that human forms were deceptive things that did not stand for reality directly, but rather as a mental idealization of it (Danesi, 2004). Aristotle (384 - 322 BC), a pupil of Pluto, investigate the relation between forms and reality more closely. There are still many name who has big impact toward semiotics world but since we will not concentrate on historical perspective, we will not go into the details on semiotics history. We will propose some theories which will have impact towards our understanding of Web as a sign systems.

The term "Semiotics" was used by British Philosopher - John Locke (1632 - 1704). At that time, the term was "Semeiotics" (from Greek word "Semeion", means "a sign, a mark"), and it was used in his book "Essay Concerning Human Understanding" (1690). Meanwhile, Ferdinand de Saussure (1857 - 1913) used the word "Semiology" to denote the study of sign (he used the -logy just as other discipline such as psychology, biology, anthropology, sociology, etc). Charles S. Pierce reintroduce Locke's concept and consistently used the word "Semiotics". Until now, it becomes a strong influence and people tend to use the word "Semiotics" (Danesi, 2004). There are some scholars who made definition about Semiotics. The shortest definition is that it is "the study of signs", while a sign is defined as "something that stands for something, to someone in some capacity" (Danesi and Perron, 1999). A definition of Semiotics by Ferdinand de Saussure (although he called it "Semiology" in this definition) will be used:

A science that studies the life of signs within society is conceivable. It would be part of social psychology and consequently of general psychology. I shall call it semiology (from Greek semeion “sign”). Semiology would show what constitutes signs, what laws govern them.

Saussure offered a "dyadic" or two-part model of the sign. He defined a sign as being composed of "signifier" / "signifiant" (the form which the sign takes) and the "signified" / "signifié" (the concept it represents) (Chandler, 2011). In a graphical form, this definition and its example can be represented below (picture was taken from Chandler, 2011):


Different with Saussure, Peirce characterized "triadic" or three-part model of the sign. He defined a sign as being composed of the three elements:

  1. Sign or Representamen (e.g Saussure's signifier).
  2. Object: the thing that represented by sign. This could be physically real object such as "laptop" and "car", or abstract concept such as "bright idea" and "I don't care about the story that you told me and I feel boring".
  3. Interpretant: according to Peirce in his own words: "The Sign creates something in the Mind of the Interpreter, which something, in that it has been so created by the sign, has been, in a mediate and relative way, also created by the Object of the Sign, although the Object is essentially other than the Sign. And this creature of the sign is called the Interpretant" (see Bergman and Paavola, 2003). Simply put, it is the part of sign which is used to denote the meaning of sign by sign interpreter, the sense made by the sign.

These triadic model can be represented with the diagram below (picture was taken from Irvine, 2012):


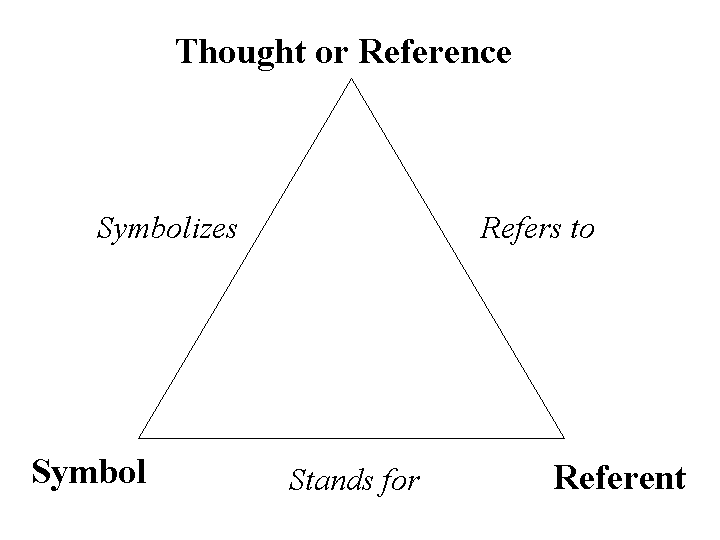
The Peirce triadic model also known as "The Semiotic Triangle", has some variants. The most well-known variant is the semiotic triangle which proposed by Ogden and Richard in their book which was published in 1923 titled "The Meaning of Meaning" (picture was taken from http://lchc.ucsd.edu/mca/Paper/Engestrom/expanding/ch2.htm):

Semiotics and Sign System

Loosely speaking, a website can always be considered as the representation of whatever behind the website, be it a company, a person, business entity, musical band, singer, etc. Using Peirce's Triadic, we may define a website as a part of semiotics and as a sign system below:


It is clear from the diagram that developing website should consider first about "what should be the interpretant"? We may then can begin our adventure to web semiotics by accomodating some theory from algebra, which is now known as "Algebra Semiotics". Surely there are many areas which affect the engineering of a website, for example, social aspect should be considered as an important part, the "knowledge" embedded into the website also make sense as a part of knowledge engineering, while we should not forget also many technical TCP/IP things and all other important software engineering topics related with the engineering of the web, and many others.

In the future, I will dig deeper about Algebra Semiotics and how it probably can help developers in Semantic and Pragmatic Web. 

References
  • Daniel Chandler, "Semiotics for Beginner", http://users.aber.ac.uk/dgc/Documents/S4B/, accessed July 8, 2012 22:40.
  • Marcel Danesi, Paul Perron, "Analyzing Cultures: An Introduction and Handbook", Indiana University Press, 1999.
  • Marcel Danesi, "Messages, Signs, and Meanings: A Basic Textbook in Semiotics and Communication", 3rd edition, Canadian Scholars' Press Inc, Toronto, 2004.
  • Martin Irvine, "Structural Linguistics, Semiotics, and Communication Theory: Basic Outlines and Assumptions", http://www9.georgetown.edu/faculty/irvinem/theory/Semiotics_and_Communication.html, accessed July 9, 2012 05:45.
  • Mats Bergman, Sami Paavola, "The Commens Dictionary of Peirce's Terms", http://www.helsinki.fi/science/commens/dictionary.html, accessed July 9, 2012 05:16.


Juli 13, 2012

Utilizing Leiningen Profile

In my previous post about setting up Emacs for Clojure development, I suggest to include lein-swank inside the plugins' project.clj. Eventhough this approach work, here I will explain how to use Leiningen profile to separate the plugins / libraries which will act as helper and with other plugins / libraries which will be included in the project result. You will find that separation of concerns is beatiful.

Ok, now here's the problem. I would like to use lein-swank for my development with Emacs but I don't want to interfere my project with all of those clutters, I just want my project to include my source code and my libraries. This is where Leiningen profile comes into play. To this end, use profile.clj inside Leiningen home (that is $HOME/.lein/). The default profile which will be executed is "user". Here is mine:

[bpdp@bpdp-arch ~]$ tree .lein/
.lein/
|-- profiles.clj
`-- self-installs   
     |-- leiningen-1.7.1-standalone.jar   
      `-- leiningen-2.0.0-preview7-standalone.jar
 
1 directory, 3 files[bpdp@bpdp-arch ~]$ 


Here's the profile.clj content:

[bpdp@bpdp-arch .lein]$ cat profiles.clj 
{:user {:plugins [[lein-swank "1.4.4"]
                         [lein-pprint "1.1.1"]]}}
[bpdp@bpdp-arch .lein]$ 


This way, you can - for example - execute lein-swank without include them in your project.clj anymore. You may add other plugins. I just use lein-pprint in the meantime. There are still many things that can be done using this profile, for example, you can use this profile to test multiversion plugins / libraries, etc. I will write them later.

Happy hacking!

Juli 12, 2012

Using Emacs for Clojure Development

There are many (confusing) blog posts about using Emacs for Clojure development but I promise you not to make you confuse a bit more (hopefully. :-D). Since I use Clojure for my dissertation and usually Clojurians use Emacs (for obvious reasons), then here I come.

There are some steps to do to prepare Emacs. I use Linux (Arch Linux) here, so, probably it won't be applicable for other OS, but this usually the same with other Linux distros. Some software that needs to be installed properly before are JDK, Clojure, Leiningen (I use version 2), and Emacs (version 24, 23 is okay but you have to prepare package management by yourself and it's quite tricky). Those are already explained properly at each of the website, so I will not repeat it again here. Basically, there are one-time-only setup procedures below:

  1. Setup Emacs package management
  2. Install clojure-mode, swank-clojure, slime and slime-repl
  3. Prepare syntax highlighting
When they are all installed and configured successfully, then the project and source code should be configured  to include swank-clojure.
  1. Prepare project: source code and dependencies.
After all of those steps, then all you have to do is coding. The details follow.

Setup Emacs Package Management
In Linux, usually all of those Emacs file for user will reside in $HOME/.emacs.d/. Inside, there is a file - init.el - which is used to store Lisp script for Emacs configuration. To setup Emacs package management, put this into init.el:


(require 'package)
(setq package-archives '(("ELPA" . "http://tromey.com/elpa/")
    ("gnu" . "http://elpa.gnu.org/packages/")
    ("marmalade" . "http://marmalade-repo.org/packages/")))
(package-initialize)

Those lines are used to let Emacs know about the package archives / repositories (ELPA, gnu, and marmalade) then activate package management. If you edit the init.el file from Emacs, you may activate them by using M-x eval-current-buffer when you are in init.el buffer. If you are confuse, just exit from Emacs (C-x C-c) then fire up Emacs again.

Install clojure-mode, swank-clojure, slime and slime-repl
SLIME (The Superior Lisp Interaction Mode for Emacs) and SLIME-REPL are package to interact with Lisp, especially useful for coding (code evaluation, completion, /etc). In this post, we will install this and make it interact with swank for the benefit of coding in Clojure inside Emacs. Here is how to install them:
  1. M-x package-list-packages, it will access package repositories and show them inside buffer.
  2. Find clojure-mode, swank-clojure, slime, and slime-repl on the list. In each of package, click on the name, then click on "Install" (yes, you can also use your keyboad: put cursor on the name, enter, then "C-x o" to go to the description window below, put cursor on "Install" then RET (or you may call it Enter key).

Prepare Syntax Highlighting
To activate clojure-mode and make all color output, put this into init.el:
;; these for Clojure, activate then turn on 
(require 'clojure-mode)
(defun turn-on-paredit () (paredit-mode 1))
(add-hook 'clojure-mode-hook 'turn-on-paredit)

;; syntax highlighting for swank
(add-hook 'slime-repl-mode-hook
   (defun clojure-mode-slime-font-lock ()
     (require 'clojure-mode)
     (let (font-lock-mode)
       (clojure-mode-font-lock-setup))))
;;
And that's all for setting up Clojure development environment in Emacs. The following detail is only one-time whenever you want to create new project.

Prepare Project Source Code and Dependencies
Using Leiningen, use this command (my Leiningen script name is "lein2", by default, if you follow installation instruction in Leiningen website, this script name should be "lein". I use "lein2" because I have 2 Leiningen alive: "lein" for stable version - 1.x and "lein2" for development version - 2.x):

[bpdp@bpdp-arch clojure]$ lein2 new zax
Generating a project called zax based on the 'default' template.
To see other templates (app, lein plugin, etc), try `lein help new`.
[bpdp@bpdp-arch clojure]$ tree zax/
zax/
|-- README.md
|-- doc
|   `-- intro.md
|-- project.clj
|-- src
|   `-- zax
|       `-- core.clj
|-- target
|   |-- classes
|   `-- stale
|       `-- dependencies
`-- test
    `-- zax
        `-- core_test.clj

8 directories, 6 files
[bpdp@bpdp-arch clojure]$ 
Edit project.clj to include lein-swank plugin:
[bpdp@bpdp-arch zax]$ cat project.clj 
(defproject zax "0.1.0-SNAPSHOT"
  :description "FIXME: write description"
  :url "http://example.com/FIXME"
  :license {:name "Eclipse Public License"
            :url "http://www.eclipse.org/legal/epl-v10.html"}
  :dependencies [[org.clojure/clojure "1.4.0"]]
              :plugins [[lein-swank "1.4.4"]])
[bpdp@bpdp-arch zax]$ 
That's all for project and source code preparation. Now, whenever you want to go crazy with Emacs and Clojure, activate swank server and have it connected from inside Emacs. This step below will show you the details:

Activate swank server
Use this command from shell:

[bpdp@bpdp-arch zax]$ lein2 swank 4005 localhost :colors? true 
Listening for transport dt_socket at address: 50069
Connection opened on localhost port 4005.
From inside Emacs, you may connect to this process by using "M-x slime-connect". Emacs will ask you the host and port where swank live: 

Host: 127.0.0.1
Port: 4005

RET to accept the default value. Emacs will activate SLIME:


The statement "Connected. Your hacking starts... NOW!" probably different with yours. It will be displayed randomly (some will make you laugh or at least smile). Whenever we have source code in Clojure, we can evaluate or do many things (see swank-clojure README). Here I just want to give example of evaluating current buffer. Put the source code into the new buffer, here's the example:

(defn relay [x i]
  (when (:next x)
    (send (:next x) relay i))
  (when (and (zero? i) (:report-queue x))
    (.put (:report-queue x) i))
  x)
 
(defn run [m n]
  (let [q (new java.util.concurrent.SynchronousQueue)
        hd (reduce (fn [next _] (agent {:next next}))
                   (agent {:report-queue q}) (range (dec m)))]
    (doseq [i (reverse (range n))]
      (send hd relay i))
    (.take q)))
 
(time (run 1000 1000))

(print "It's the end of the beginning")
To evaluate and run, go to the buffer, then do "C-c C-k". Here's the result:


The result will be showed in REPL:


That's all. happy hacking!